trim install baseboards wood stain wikihow Whichever type of wood you are staining, always follow the manufacturers instructions for whatever products you use to ensure the best results. Mineral spirits. Before you can begin staining the trim, it has to be properly sanded. To start with, you can apply most stains with either a brush or a cloth. Wipe off the stain with clean cotton rags in the same order you put it on. If it's too light, repeat the steps. The sanding tool you select depends on the profile and size of the trim youre finishing. There are some things to consider before you decide to stain trim. For a satin-smooth oil finish, rub the dry surface between coats with extra-fine (#0000) steel wool. Save my name, email, and website in this browser for the next time I comment. Let the sealer dry overnight. This article has been viewed 60,263 times. Experiment with different types until you find the one that suits your needs. Natural bristles should not be used with water-based stains. For many years painters would stain after installation, any stain that bled was covered by paint later. Sand just enough to remove the sheen. It doesnt take long for stain to start drying, and it becomes sticky and hard to remove. Piles of damp staining rags are a spontaneous combustion hazard. If youre working in a clean room and did a good job of sanding the sealer, one coat will be plenty. Caitlin Sole is the senior home editor at BHG. Clean up with mineral spirits or paint thinner if necessary. After you have finished sanding the entire piece of trim, all of the nail holes and cracks should be filled and sanded smooth.

Edit: Prefinishing works best when possible, "WISH IN ONE HAND, #### IN THE OTHER AND SEE WHICH FILLS UP FIRST". Dont use old bed sheets or clothes that contain synthetic fibers. May work for you.
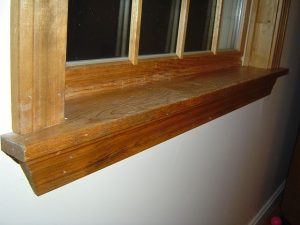
floors Wait 24 hours for it to completely dry before oiling or protecting your newly-stained trim. An investment in good tools and accessories will greatly speed up the job and increase the quality of your finishing work.

Dont waste time. Lastly, look carefully at the edges to find any drips and smooth them out with the brush. If the stain is too light, apply a second coat. Well show you how and when to sand, using the correct sanding products. Rags are messy and waste stain. Sand extra trim, cut it into 3-in. The edge will wear quickly, so refold the paper often. These woods tend to get splotchy if you do not seal them prior to staining. But measure carefully so you can replicate your results on a larger scale. UNLIMITED membership - Get access to it all.

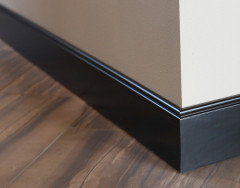
Stained wood trim adds a level of elegant beauty to your home. Enter now for your chance to win more than $2,000 worth of woodworking equipment from Woodpeckers. Wipe with light, even pressure.
wainscoting We recommend our users to update the browser. Its always a good idea to try out your stain on an inconspicuous area before doing the entire project. Get complete site access to video workshops, digital plans library, online archive, and more, plus the print magazine. Shiny streaks or spots indicate missed spots. If youre staining more than one piece of trim at a time, work on each with the same amount of care to avoid any color discrepancies. Avoid lap marks by maintaining a wet edge. Sanding supplies. Use them to eliminate the last specks of dust after you sand between coats. Allow this to dry according to the label recommendations and then sand with fine steel wool or 220-grit sandpaper. Allow the finish coat to dry completely before installing the trim. pieces and start experimenting.
Clean all sanding dust and debris from the trim using a tack cloth. Buy 100-grit (medium) products for sanding the raw wood and either 240- or 280-grit (extra-fine) sanding paper, sponges and pads for sanding between clear coats, depending on the profiles youre sanding. If there are rooms overhead, declare a moratorium on overhead foot traffic during finishing. She is co-founder of On Fiction Writing, a website for writers. Clean stain from cracks and crevices with a dry brush. The best application method is to simply dip a natural-bristle brush into the stain and brush it right onto the wood (Photo 4). If youre unhappy with grain lines that are too dark compared with the surrounding wood (Photo 5), restain and wipe the whole surface and let it sit overnight again. You can lighten stain easily by diluting it with paint thinner. Once applied, allow this coat to dry completely before adding additional coats if needed.
inspire complement  ceiling trim install ehow
 If you see brush marks after tipping off, leave them and sand them out later. Its aggressive and cuts and smoothes quickly. (Use the same method to mix the sanding sealer and the wood varnish later.) You can use a natural brush or a clean rag to apply it in straight lines. By signing up you are agreeing to receive emails according to our privacy policy. All tip submissions are carefully reviewed before being published.
A good finish starts with sanding the bare wood with a 100-grit sanding sponge and/or paper. Or do your clear-coat work after everyones gone to bed. If you use a sanding sealer thats incompatible with the wood varnish, the surface may crinkle or even flake off. china-bristle brushes (natural bristles).
shingles sidewall shingle stained siding primed Finally, I fill and touch up the nail holes.
wholesteading Its formulated with more solids than conventional clear coats, making it very easy to sand. Dont sand with finer grits at this stage or youre likely to end up with uneven stain. Polyurethane finishes are tough and have their place, especially on high-wear, water-prone surfaces like tabletops and hardwood floors. If youre forced to sand in the finishing area, wait several hours after sanding before cleaning the room, to give the dust a chance to settle out of the air.

Sand the face of the trim, as well as the edges and corners, with fine-grit sandpaper, working in the direction of the wood grain. Our biweekly podcast allows editors, authors, and special guests to answer your woodworking questions and connect with the online woodworking community. Then, I daba little stain on end cuts (miters, etc.)
staining cedar 
Smooth away all tool marks and scratches, and round the edges and corners slightly. Otherwise dust on the underside of the floor will rain down on wet finishes. Your email address will not be published. Your fingertips and eye will tell you when enough is enough. After you have wiped down the wood trim, it is time to apply your stain. Use natural-bristle brushes when using oil-based stains.
shower base pan floor plastic tile drain fiberglass acrylic cleaning bathroom clean floors install walls remove prefabricated toilet plate tiled window stool trim apron cap casing interior carpentry wood homeadditionplus installing finish sill casings windows sills trims frame ledge install After reading this article, we hope you have gained a better understanding of how to stain trim. You don't need expensive tools or special knowledge or skills to get a flawless finishjust sand, stain, seal and finish. Some stains are also available in various sheens such as matte, satin and semi-gloss to allow even more flexibility. Natural bristles should not be used with water-based stains. Either way, specks in the finish mean the room is still dirty. This works great when we have to install and paint base molding over new carpeting.
shingles sidewall spraying brushing 09. Otherwise, imperfections like scratches caused by cross-grain sanding or chatter marks will become painfully obvious when you start staining. How to Install Baseboard Molding, Even on Crooked Walls, Trim Paint Tips for Smooth and Flawless Results, How to Install Craftsman Window Trim and Craftsman Door Casing, Perfect Trim on Doors, Windows and Base Moldings, How to Fill Holes in Woodwork Around Your Home, We are no longer supporting IE (Internet Explorer), 10 Best Home Improvement Projects Under $250, Do Not Sell My Personal Information CA Residents. Blemishes can include dirt, fingerprints, machining imperfections and label residue. Plus tips, advice, and special offers from Fine Woodworking.
cedar decking vancouver deck roof bench stained Reapply until the wood will not absorb any more oil. Then well tell you how to apply stain evenly and without blotches on all the surfaces. 02. Avoid lap marks by maintaining a wet edge. Continue applying stain to each piece of trim until you cover all pieces. Lay the trim, with the face side up, on a flat surface. before I installeach piece. The idea is to let it soak into all areas of the wood for about the same amount of time (Photo 5). Mix stain thoroughly before using. In this article, well show you a simple three-day process thatll give you great results every time. They may leave behind dyes and wont absorb stain nearly as well. Finally, closely examine the surface for smudges, brush marks and blotches. This site is protected by reCAPTCHA and the Google, Editor's Letter: Technology and the future of woodworking. A cheap brush is more likely to leave brush marks and bristles in the finish. Click for full details. Miller holds a diploma in social services from Clarke College in Belleville, Ontario. Smooth it with a putty knife and sand smooth once it is dry. (Its not the tedious, mind numbing job you might think it is!) Wipe off any excess stain with a clean lint-free cloth.